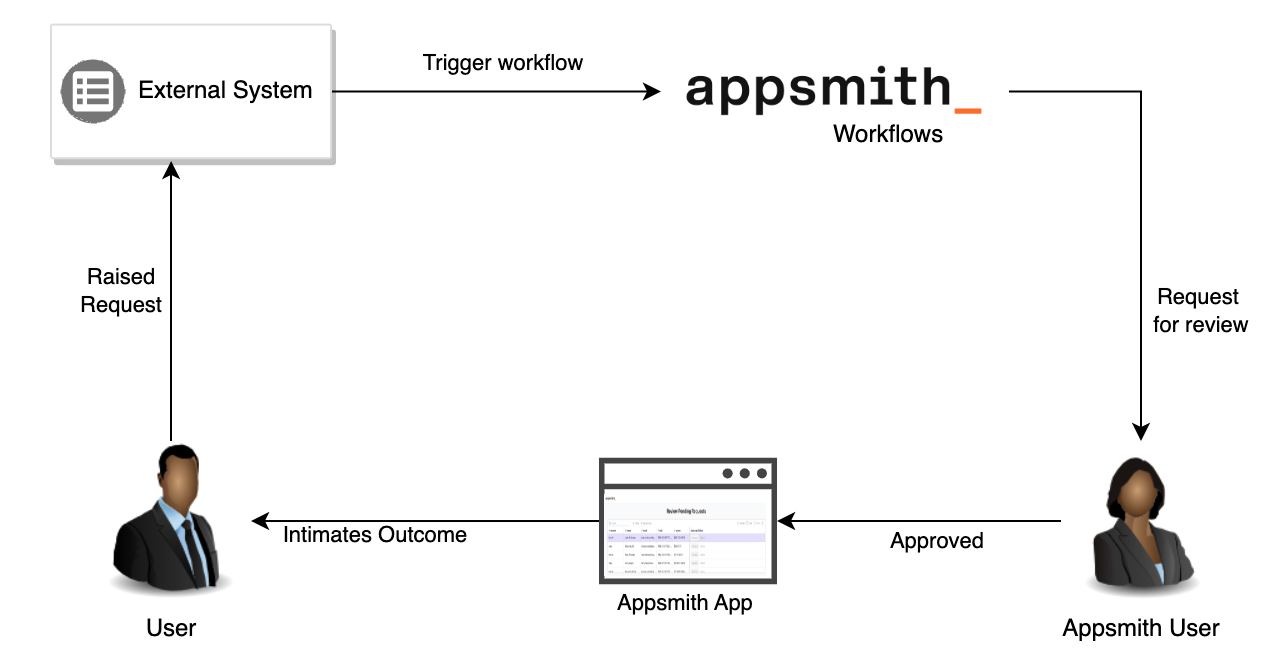
Create Approval Workflow
In a human-in-the-loop approval workflow, such as processing refund requests, you can use workflows in Appsmith. The human intervention can happen through your Appsmith app. This page shows how to set up a human-in-the-loop approval workflow using Appsmith.
Prerequisites
Before you start, make sure you have:
- A self-hosted instance of Appsmith. Refer to the Appsmith installation guides for detailed instructions on setting up your Appsmith instance.
- Basic knowledge of creating a basic workflow in Appsmith. For more information, see Tutorial - Create Basic Workflow.
- Configured your datasource that manages your data and SMTP datasource (to notify users) in your workspace. If not, configure these datasources. For more information on configuring datasource, see the available Datasources in Appsmith.
Create workflow
Follow these steps to set up a webhook workflow within your workspace.
-
Create a new workflow (Refunds) in your workspace.
-
Configure it as a webhook workflow.
-
Create a query to fetch order details (getOrderDetails) details. For example, the below query fetches the order details for the given
order_idfrom theorderstable.-- The order_id is a parameter, and replaced by actual value passed by the application
select * from public. "orders" where order_id = {{this.params.order_id}}; -
Create a query to update the order status on refund processing. For example, when user approves a refund request, update the order status in the
ordertable toRefund Processed. In case of rejection, the order status remains unchanged.-- The order_id are parameters and replaced by actual value passed by the application
Update public. "orders" set status = 'Refund Processed' where order_id = {{this.params.order_id}}; -
Create queries to send emails to inform users of the outcome. For example, you can create two queries:
- To notify approval (notifyUser):
- Parameterize the query to include:
- Customer name (
{{this.params.customer_name}}) who raised the request. - Customer email (
{{this.params.customer_email}}) to send email notification.
- Customer name (
- Parameterize the query to include:
- To notify rejection (notifyRejectionToUser):
- Parameterize the query to include:
- Customer name (
{{this.params.customer_name}}) who raised the request. - Customer email (
{{this.params.customer_email}}) to send email notification. - Rejection reason (
{{this.params.rejection_reason}}).
- Customer name (
- Parameterize the query to include:
- Pass these parameters from your app to the workflow.
- To notify approval (notifyUser):
-
Click the Publish button to publish the workflow.
Create approval requests
Follow these steps to create refund requests which are awaiting user interaction:
- In your workflow, go to Main under JS Objects, and add the following function. This function generates a pending request using the
assignRequestworkflow function. For more information, see the assignRequest function.export default {
async executeWorkflow(order) {
const response = await appsmith.workflows.assignRequest({
requestName: "getPendingRefundRequests",
message: "Refund raised by " + order.customer_name+ " for amount " + order.amount,
requestToUsers: [order.approver_email],
resolutions: ["Approve", "Reject"],
metadata: { "order": order }
});
if (response && response.resolution === "Approve") {
//Add logic for refund processing if any
// When user approves, execute the initiateRefund query
await initiateRefund.run({
"id": order.order_id,
"status": 'Refund Processed'
});
// Send refund approval email to the customer
await notifyUser.run({
"customer_email": refund_req.customer_email ,
"customer_name": refund_req.customer_name
});
} else if (resolution && response.resolution === "Reject") {
// Send refund rejection email to the customer
// Supply the rejection reason as a parameter
await notifyRejectionToUser.run({
"customer_email": refund_req.customer_email ,
"customer_name": refund_req.customer_name,
"rejection_reason": refund_req.rejection_reason
});
}
}
} - Click the Publish button to publish the latest changes.
Handle approvals or rejections
Follow these steps to retrieve the pending requests, build an interface for user interaction, and resolve requests based on user's action:
- In your app, create a workflow query (getRefundReqs) to fetch these requests. Configure it as follows:
- Workflow name - Select Refunds.
- Request type - Select Get requests.
- Request name - Add
getPendingRefundRequeststo it. It's the same request name you added in your workflow Main JS object inappsmith.workflows.assignRequest()in the step 1 of this section.
- Drag a Table widget and bind the getRefundReqs query to it. You may need to transform data based on your user interface requirements. In which case, use a JS object to execute the query, perform transformations, and bind the transformed data to the Table widget.
- Create another workflow query (resolveReqs) to capture Approve or Reject actions:
- Workflow name - Select Refunds.
- Request type - Select Resolve Requests.
- Request Id - Add
{{this.params.requestId}}to it. - Resolution - Add
{{this.params.resolution}}to it. - Metadata - Add
{"rejectionReason" : {{this.params.rejectionReason}}}to it.
- Bind the query (resolveReqs) to the
onClickevent of Approve and Reject buttons, and pass appropriate parameters. - Deploy your app to test approvals or rejections.
Troubleshooting
If you face issues, contact the support team using the chat widget at the bottom right of this page.